from flask import Flask

app = Flask(__name__)

# Define a route for the root URI
@app.route("/")
def index():
    # Return the content for the home page
    return "<h1>Home page!</h1>"

# Define a route for the "/hello" URI
@app.route("/hello")
def hello():
    # Return the content for the hello page
    return "<h1>Hello!!</h1>"

# Define a route for the "/first" URI
@app.route("/first")
def first():
    # Return the content for the first page
    return "<h3>First page!!</h3>"

if __name__ == "__main__":
    app.run(host="0.0.0.0", port="5555")
* Serving Flask app '__main__' * Debug mode: off
WARNING: This is a development server. Do not use it in a production deployment. Use a production WSGI server instead.
 * Running on all addresses (0.0.0.0)
 * Running on http://127.0.0.1:5555
 * Running on http://172.22.109.123:5555
Press CTRL+C to quit
127.0.0.1 - - [01/Jan/2025 19:36:52] "GET / HTTP/1.1" 200 -
127.0.0.1 - - [01/Jan/2025 19:36:52] "GET /favicon.ico HTTP/1.1" 404 -
127.0.0.1 - - [01/Jan/2025 19:37:28] "GET /hello HTTP/1.1" 200 -
127.0.0.1 - - [01/Jan/2025 19:37:41] "GET /first HTTP/1.1" 200 -
1.2. Using Variables in URIs
When a username is entered into the URI, it will be displayed on the HTML page.
This allows dynamic content to be rendered based on the provided URI parameters.
from flask import Flask

app = Flask(__name__)

@app.route("/")
def index():
    return "<h1>Home page!</h1>"

@app.route("/hello")
def hello():
    return "<h1>Hello!!</h1>"

@app.route("/first")
def first():
    return "<h3>First page!!</h3>"

# Define a route that accepts a dynamic variable `username`
@app.route("/profile/<username>")
def get_profile(username):
    # Dynamically return the username passed in the URI
    return f'<h1>Hello my name is {username}</h1>'

if __name__ == "__main__":
    app.run(host="0.0.0.0", port="5555")
* Serving Flask app '__main__' * Debug mode: off
WARNING: This is a development server. Do not use it in a production deployment. Use a production WSGI server instead.
 * Running on all addresses (0.0.0.0)
 * Running on http://127.0.0.1:5555
 * Running on http://172.22.109.123:5555
Press CTRL+C to quit
127.0.0.1 - - [01/Jan/2025 19:39:55] "GET / HTTP/1.1" 200 -
127.0.0.1 - - [01/Jan/2025 19:40:12] "GET /profile/WoongKeol%20Kim HTTP/1.1" 200 -
127.0.0.1 - - [01/Jan/2025 19:41:22] "GET /profile/Kim HTTP/1.1" 200 -
1.3. Specifying Data Types for URI Variables
If no data type is specified, the variable is treated as a string by default.
Flask allows you to specify other data types like int or float for dynamic URI variables.
from flask import Flask

app = Flask(__name__)

@app.route("/")
def index():
    return "<h1>Home page!</h1>"

@app.route("/hello")
def hello():
    return "<h1>Hello!!</h1>"

@app.route("/first")
def first():
    return "<h3>First page!!</h3>"

@app.route("/profile/<username>")
def get_profile(username):
    return f'<h1>Hello my name is {username}</h1>'

# Define a route with an integer variable `message_id`
@app.route("/message/<int:message_id>")
def get_message(message_id):
    # Dynamically return the integer `message_id` passed in the URI
    return f'<h3>Message id: {message_id}</h3>'

if __name__ == "__main__":
    app.run(host="127.0.0.1", port="5555")
* Serving Flask app '__main__' * Debug mode: off
WARNING: This is a development server. Do not use it in a production deployment. Use a production WSGI server instead.
 * Running on http://127.0.0.1:5555
Press CTRL+C to quit
127.0.0.1 - - [01/Jan/2025 19:43:50] "GET / HTTP/1.1" 200 -
127.0.0.1 - - [01/Jan/2025 19:43:59] "GET /message/a HTTP/1.1" 404 -
127.0.0.1 - - [01/Jan/2025 19:44:17] "GET /message/3 HTTP/1.1" 200 -
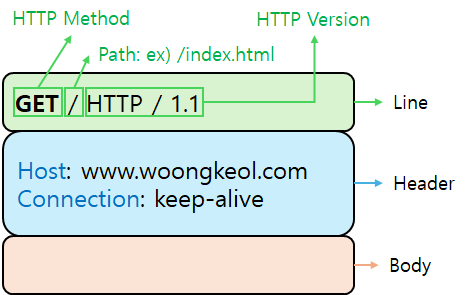
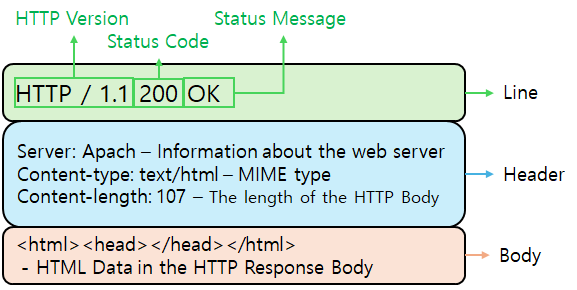
2.3. REST (REpresentational State Transfer)
REST is an architectural style for distributed systems.
- It transfers the state of a resource through its representation (e.g., JSON, XML).
- Resources are identified using HTTP URIs, and HTTP methods are used to perform CRUD operations on the resources:
- CRUDOperations with HTTP Methods:
- Create: Create a new resource (POST)
- Read: Retrieve a resource (GET)
- Update: Modify an existing resource (PUT)
- Delete: Remove a resource (DELETE)
2.4. REST API
A REST API implements services based on the REST architecture.
It is commonly used in microservices, OpenAPIs (APIs available for public use), and other distributed systems.
2.5. Implementing REST APIs with Flask
You can create a REST API in Flask by responding to specific URIs with data in JSON format.
Flask converts Python dict objects into JSON responses using the jsonify() method.
2.6. Flask jsonify() Function
The jsonify() function in Flask returns data in JSON format, simplifying API responses.
3. Implementing REST APIs
from flask import Flask, jsonify
app = Flask(__name__)

# Create a route that returns JSON data using jsonify()
@app.route('/json_test')
def hello_json():
    # Define data as a dictionary and return it in JSON format
    data = {'first name': 'Woong-Keol', 'last name': 'Kim'}
    return jsonify(data)

# Create another route that provides server information in JSON format
@app.route('/server_info')
def server_json():
    data = {'server_name': 'localhost', 'server_port': '5555'}
    return jsonify(data)

if __name__ == "__main__":
    app.run(host="127.0.0.1", port="5555")
* Serving Flask app '__main__' * Debug mode: off
WARNING: This is a development server. Do not use it in a production deployment. Use a production WSGI server instead.
 * Running on http://127.0.0.1:5555
Press CTRL+C to quit
127.0.0.1 - - [01/Jan/2025 21:41:53] "GET / HTTP/1.1" 404 -
127.0.0.1 - - [01/Jan/2025 21:41:59] "GET / HTTP/1.1" 404 -
127.0.0.1 - - [01/Jan/2025 21:42:04] "GET /json_test HTTP/1.1" 200 -
127.0.0.1 - - [01/Jan/2025 21:42:32] "GET /server_info HTTP/1.1" 200 -
3.1. Implementing Frontend and Backend Together Using Flask
from flask import Flask, jsonify, request

app = Flask(__name__)

@app.route('/')
def index():
    return '<h1>Welcome to Homepage</h1>'

# Create a route for login authentication
@app.route('/login')
def login():
    # Retrieve the username from query parameters
    username = request.args.get('user_name')
    if username == 'Kim':
        ret_data = {'auth': 'success'}
    else:
        ret_data = {'auth': 'failed'}
    return jsonify(ret_data)

if __name__ == '__main__':
    # Run the Flask application
    app.run(host='0.0.0.0', port='5555')
* Serving Flask app '__main__' * Debug mode: off
WARNING: This is a development server. Do not use it in a production deployment. Use a production WSGI server instead.
 * Running on all addresses (0.0.0.0)
 * Running on http://127.0.0.1:5555
 * Running on http://172.22.109.123:5555
Press CTRL+C to quit
127.0.0.1 - - [01/Jan/2025 21:47:01] "GET / HTTP/1.1" 200 -
127.0.0.1 - - [01/Jan/2025 21:47:09] "GET /login HTTP/1.1" 200 -
127.0.0.1 - - [01/Jan/2025 21:47:26] "GET /login/&user_name=Kim HTTP/1.1" 404 -
127.0.0.1 - - [01/Jan/2025 21:47:31] "GET /login/?user_name=Kim HTTP/1.1" 404 -
127.0.0.1 - - [01/Jan/2025 21:47:45] "GET /login?user_name=Kim HTTP/1.1" 200 -
127.0.0.1 - - [01/Jan/2025 21:47:57] "GET /login?user_name=Kim HTTP/1.1" 200 -
127.0.0.1 - - [01/Jan/2025 21:49:02] "GET /login?user_name=Lee HTTP/1.1" 200 -
127.0.0.1 - - [01/Jan/2025 21:49:19] "GET /login?user_name=Lee HTTP/1.1" 200 -
#### Enhanced Version: Adding Multiple Parameters for Login Authentication

from flask import Flask, jsonify, request

app = Flask(__name__)

@app.route('/')
def index():
    return '<h1>Welcome to Homepage</h1>'

# Route to handle login with multiple parameters
@app.route('/login')
def login():
    # Retrieve multiple query parameters from the request
    username = request.args.get('user_name')
    pw = request.args.get('pw')
    email = request.args.get('email_addr')

    # Validate username and password
    if username == 'Kim':
        if pw == 'password':
            ret_data = {'auth': 'success', 'email_address':email}
        else:
            ret_data = {'auth': 'failed'}
    else:
        ret_data = {'auth': 'failed'}
    return jsonify(ret_data)

if __name__ == '__main__':
    app.run(host='0.0.0.0', port='5555')
* Serving Flask app '__main__' * Debug mode: off
WARNING: This is a development server. Do not use it in a production deployment. Use a production WSGI server instead.
 * Running on all addresses (0.0.0.0)
 * Running on http://127.0.0.1:5555
 * Running on http://172.22.109.123:5555
Press CTRL+C to quit
127.0.0.1 - - [01/Jan/2025 21:56:01] "GET /login?user_name=Lee&pw=password&emain_addr=kim.woongkeol@gmail.com HTTP/1.1" 200 -
127.0.0.1 - - [01/Jan/2025 21:56:18] "GET /login?user_name=Kim&pw=password&emain_addr=kim.woongkeol@gmail.com HTTP/1.1" 200 -
127.0.0.1 - - [01/Jan/2025 21:56:33] "GET /login?user_name=Kim&pw=password&email_addr=kim.woongkeol@gmail.com HTTP/1.1" 200 -
127.0.0.1 - - [01/Jan/2025 21:59:24] "GET /login?user_name=Lim&pw=password&email_addr=- HTTP/1.1" 200 -
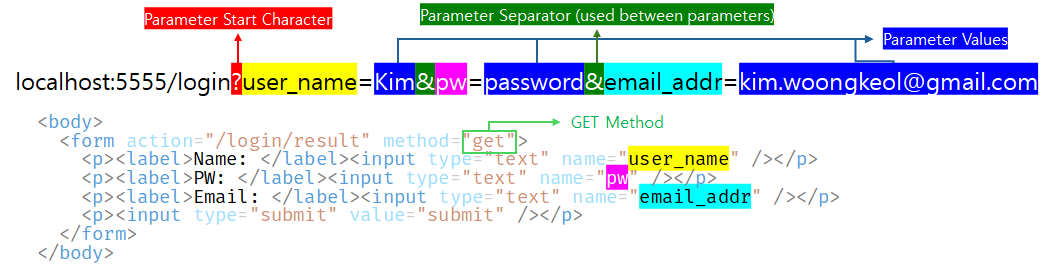
3.2. Adding Parameters in REST API Requests
The most common HTTP request method is GET.
- In GET requests, parameters and their values are included in the URI.
Syntax: URL?parameter1=value1¶meter2=value2
- After the base URL, use
?to indicate the start of parameters. - Use
&to separate multiple parameters.